Getting started
Gravity is a Usage-Driven Testing platform, meaning you need usage data to make it work. On this page, learn how to start collecting these data from your application and send them to Gravity.
#Pre-requisites
- Gravity account (Book a demo)
- A web application
#Installation
Compatibilities
Gravity only works for web applications for now. We might support mobile and/or desktop applications in the future.
Get your authentication keys
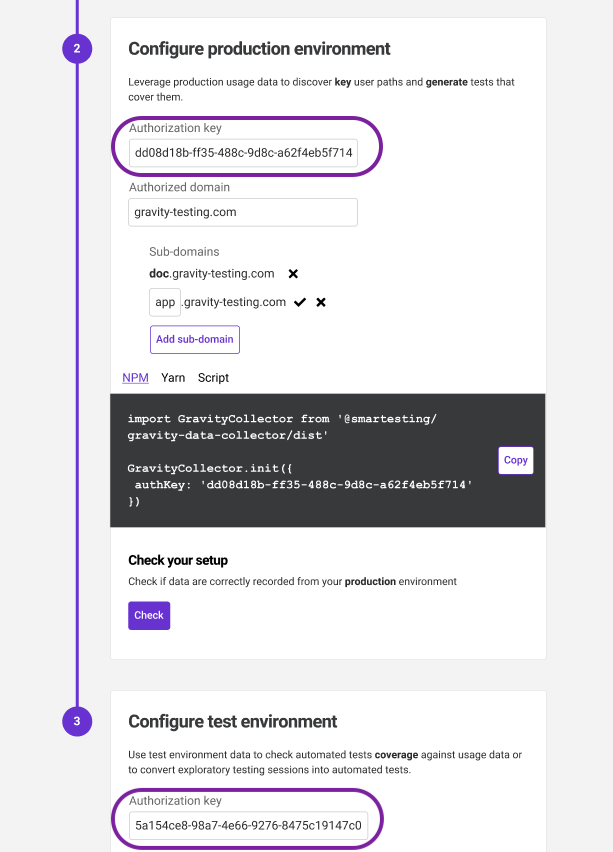
- Go to the Configuration page of your domain. You will be redirected to this page if no data has been received.
- Get the key for your production environment. You will need it to record User sessions.
- Get the key for your production environment. You will need it to record Test sessions.

Why two keys?
Gravity helps you decide what end-to-end tests should be integrated into your test suite. For that purpose, it compares what your users do against what you test.
Install the JavaScript library
Our data collector is open-source. Check it out here: Github - @smartesting/gravity-data-collector
Browser only
This library is designed to work in a browser. Do not install it in a Node environment
There are the multiple ways to install the collector. Pick the one that fit with your tool stack:
NPM
npm install @smartesting/gravity-data-collector
Yarn
yarn add @smartesting/gravity-data-collector
CDN
<script async id="logger" type="text/javascript"
  src="https://unpkg.com/@smartesting/gravity-data-collector/dist/gravity-logger-min.js">
</script>
Add it to your package.json file
{
  "dependencies": {
    "@smartesting/gravity-data-collector": "^3.14.0"
  }
}
Authorize domain (production only)
You must tell Gravity from which domain name the collector will send data. It allows you to ensure the data have been sent by you and not someone else on your behalf.
Just enter the domain name in the dedicated field (no need to prepend http or https://)


Initialize the script
Once the collector has been correctly installed, you must tell it when to start. It only takes a simple line of code:
  import GravityCollector from '@smartesting/gravity-data-collector/dist'

  GravityCollector.init({
    authKey: '<Production or test environment key>'
  })
You will usually paste this code into your application entry point (index.js|html|...), but nothing prevents you doing it anywhere else (for example, if you want to focus only on a specific part of your application)
#What data are collected?
Once initialized, the script will automatically record information and send them to your Gravity domain:
- Session started When the collector is initialized, it sends a "Session started" event so you can track when the current user started to interact with your application
- Click triggered when the current user clicks somewhere in the GUI of your application
- Fill triggered when the current user changes the value of an input field
- Check triggered when the current user interacts with a check box
- Press key/release key triggered when a user press/release a key of their keyboard
Privacy & GDPR compliance
We built the Gravity data collector with the privacy of your users in mind since the very beginning. It does not record any information that allow identification of a user. All the fields data are obfuscated so we never store any critical information (like social security number, passwords, credit card...)
#Metadata
A set of metadata is sent with every recorded event:
- Location information about the page where the event has been recorded
- Viewport information about the device used by the current user
- Data event-specific data (for example: in the case of a Click, it contains the coordinates of the pointer when the event happened)
- Target data related to the HTML element the current user interacted with